Custom Rules
Regal is built to be easily extended. Using custom rules is a great way to enforce naming conventions, best practices or more opinionated rules across teams and organizations.
There are two types of custom rules to be aware of — those that are included with Regal in the custom category, and
those that you write yourself. The rules in the custom category provide a way to enforce common organizational
requirements, like naming conventions, by means of configuration rather than code. If your requirements aren't
fulfilled by the rules in this category, your other option is to write your own custom rules using Rego.
Your Own Custom Rules
If you'd like to provide your own linter rules for a project, you may do so by placing them in a rules directory
inside the .regal directory preferably placed in the root of your project (which is also where custom configuration
resides). The directory structure of a policy repository with custom linter rules might then look something like this:
.
├── .regal
│   ├── config.yaml
│   └── rules
│       ├── naming.rego
│       └── naming_test.rego
└── policy
    ├── authz.rego
    └── authz_test.rego
If you so prefer, custom rules may also be provided using the --rules option for regal lint, which may point either
to a Rego file, or a directory containing Rego files and potentially data (JSON or YAML).
Creating a New Rule
The simplest way to create a new rule is to use the regal new rule command. This command provides scaffolding for
quickly creating a new rule, including a file for testing. The command has two required arguments: --category and
--name, which should be self-explanatory. To create a new custom rule:
regal new rule --category naming --name foo-bar-baz
This will create a .regal/rules directory in the current working directory, if one does not already exist, and place
a starter policy and a test in a directory structure based on --category and --name in it. Following the above
example would create the following directory structure under .regal/rules:
custom/regal/rules/naming/foo-bar-baz/foo_bar_baz.rego
custom/regal/rules/naming/foo-bar-baz/foo_bar_baz_test.rego
If you'd rather create this directory structure in some other place than the current working directory, you may use the
--output flag to specify a different location. The generated rule includes a simple example, which can be verified by
running regal test .regal/rules. Modify the rule and the test to suit your needs!
If you'd like to create a new built-in rule for submitting a PR in Regal, you may add the --type builtin flag to the
command (the default is custom). This will create a similar scaffolding under bundle/regal/rules in the Regal
repository.
Developing Rules
Regal rules works primarily with the abstract syntax tree (AST) provided by OPA's parser as input. The top level item in the AST is the module, which contains nodes for everything found in a policy, like the package declaration, imports and rules.
Since OPA expects JSON as input, the module and all its child nodes are serialized, and then made available as input
in Regal linter rule policies. The opa parse --format json command can be used to get an idea of what the structure
of the serialized AST looks like. However, recent versions of Regal leverage an optimized AST JSON representation called
roast, which is both more compact and performant to traverse as part of
linting. See the roast docs for more information on how the format differs from the "normal" OPA AST.
In order to view the JSON AST representation of a policy, use the regal parse command. This works similarly to
opa parse, but only outputs the roast JSON format, including additions made by Regal.
If we were to write the simplest policy possible, and parse it using regal parse, it would contain nothing but a
package declaration:
policy.rego
package policy
Using regal parse policy.rego, we're provided with the AST of the above policy:
{
  "package": {
    "location": "1:1:1:8",
    "path": [
      {
        "type": "var",
        "value": "data"
      },
      {
        "location": "1:9:1:15",
        "type": "string",
        "value": "policy"
      }
    ]
  },
  "regal": {
    "file": {
      "name": "policy.rego",
      "lines": [
        "package policy",
        ""
      ],
      "abs": "/Users/anderseknert/tmp/custom/policy.rego"
    },
    "environment": {
      "path_separator": "/"
    }
  }
}
As trivial as may be, it's enough to build our first linter rule! Let's say we'd like to enforce a uniform naming
convention on any policy in a repository. Packages may be named anything, but must start with the name of the
organization (Acme Corp). So package acme.corp.policy should be allowed, but not package policy or
package policy.acme.corp. One exception: policy authors should be allowed to write policy for the system.log package
provided by OPA to allow
masking sensitive data
from decision logs.
An example policy to implement this requirement might look something like this:
# METADATA
# description: All packages must use "acme.corp" base name
# related_resources:
# - description: documentation
#   ref: https://www.acmecorp.example.org/docs/regal/package
# schemas:
# - input: schema.regal.ast
package custom.regal.rules.naming["acme-corp-package"]

import data.regal.result

report contains violation if {
    not acme_corp_package
    not system_log_package

    violation := result.fail(rego.metadata.chain(), result.location(input["package"].path[1]))
}

acme_corp_package if {
    input["package"].path[1].value == "acme"
    input["package"].path[2].value == "corp"
}

system_log_package if {
    input["package"].path[1].value == "system"
    input["package"].path[2].value == "log"
}
Starting from top to bottom, these are the components comprising our custom rule:
- The package of custom rules must start with
custom.regal.rules, followed by the category of the rule, and the title (which is commonly quoted as rule names use-for spaces). - The
data.regal.resultprovides some helpers for formatting the result of a violation for inclusion in a report. - Regal rules make heavy use of metadata annotations
in order to document the purpose of the rule, along with any other
information that could potentially be useful. All rule packages must have
a
description. Providing links to additional documentation underrelated_resourcesis recommended, but not required. - Note the
schemaattribute present in the metadata annotation. Adding this is optional, but highly recommended, as it will make the compiler aware of the structure of the input, i.e. the AST. This allows the compiler to fail when unknown attributes are referenced, due to typos or other mistakes. The compiler will also fail when an attribute is referenced using a type it does not have, like referring to a string as if it was a number. Set toschema.regal.astto use the AST schema provided by Regal. - Regal will evaluate any rule named
reportin each linter policy, so at least onereportrule must be present. - In our example
reportrule, we evaluate another rule (acme_corp_package) in order to know if the package name starts withacme.corp, and another rule (system_log_package) to know if it starts withsystem.log. If neither of the conditions are true, the rule fails and violation is created. - The violation is created by calling
result.fail, which takes the metadata from the package (usingrego.metadata.chainwhich conveniently also includes the path of the package) and returns a result, which will later be included in the final report provided by Regal. - The
result.locationhelps extract the location from the element failing the test. Make sure to use it!
Rule Development Workflow
In addition to making use of the regal parse command to inspect the AST of a policy, using Regal's
language server for rule development provides the absolute best rule
development experience.
Code Lens for Evaluation
If you're using VS Code and the OPA VS Code extension, you may
use the Code Lens for Evaluation to directly
evaluate packages and rules using the input.json file as input, and see the result directly in your editor on the
line you clicked to evaluate.
To start evaluating a policy against your custom rule. First turn the parse result of the policy into an input file:
regal parse path/to/policy.rego > input.json
You should now be able evaluate your custom rule against the input.json AST:
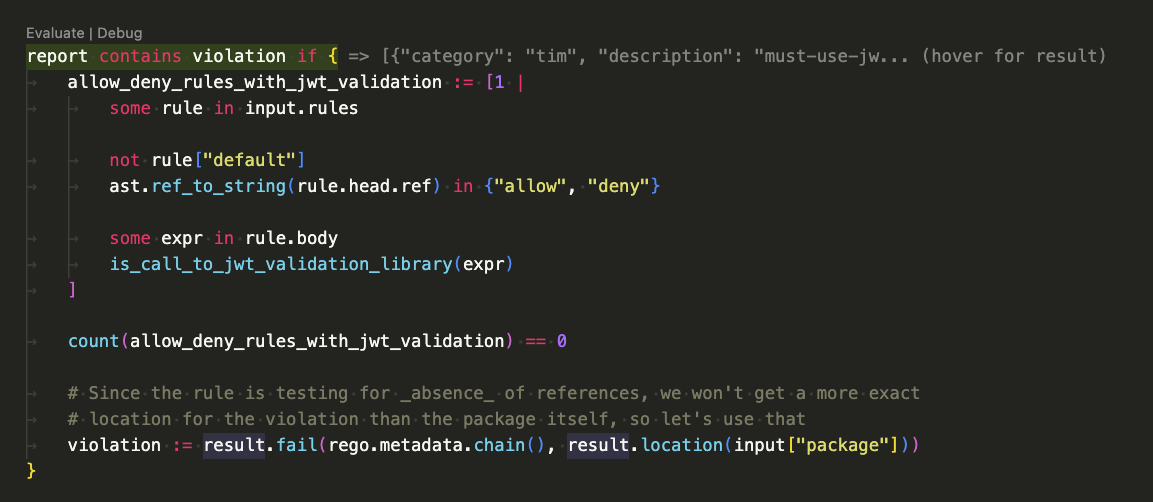
Tips:
- You can hover the inlined result to see the full output
- Calls to
printinside rule bodies will have the print output displayed on the same line
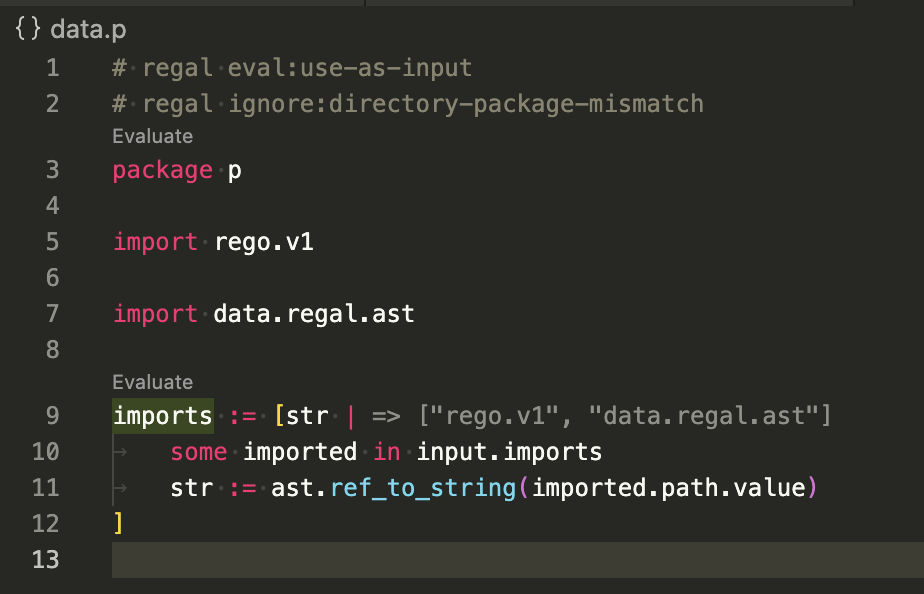
As another convenience, any .rego file where the first comment in the policy is # regal eval:use-as-input will have
the evaluation feature automatically use the AST of the file as input. This allows building queries against the AST of
the policy you're working on, providing an extremely fast feedback loop for developing new rules!
Test-Driven Development
Using a test-driven approach to custom rule development is a great way to both understand how your rule works, and to
assert that it works as expected even as you make changes to the code. Use the regal test command the same way as you
would use opa test:
regal test .regal/rules
To debug failures in your test, the --var-values flag can help by providing more information about which values
failed to match the expected output. You can also use the print function anywhere in your policy, which will have
it's output printed by the test runner.
Tests commonly first parse a policy, then provide that as input to the rule being tested. You can either use the
built-in regal.parse_module(name, policy) function to parse a policy, or one of the provided helpers in the
regal.ast package:
Using ast.with_rego_v1(policy) will have a package declararation and import rego.v1 added to the policy, allowing
you to get straight to what you actually want to test for:
test_fail_constant_condition if {
    module := ast.with_rego_v1(`allow if true`)
    report := rule.report with input as module

    count(report) == 1
    some violation in report
    violation.title == "constant-conditoon"
}
The ast.policy(policy) adds only a package declaration and not import rego.v1.
Aggregate Rules
Aggregate rules are a special type of rule that allows you to collect data from multiple files before making a decision.
This is needed in some cases where a single policy file won't be enough for a linter rule to make a decision. For
example, you may want to enforce that in a policy repository, there must be at least one package annotated with an
authors attribute. This requires first collecting annotation data from all the provided policies, and then have the
rule use this data to make a decision. The structure of an aggregate rule is similar to a regular rule, but with a few
notable differences. The most significant one is that linting happens in two separate phases — one that aggregates data
from files, and one that actually lints and reports violations using that data.
# METADATA
# description: |
#   There must be at least one boolean rule named `allow`, and it must
#   have a default value of `false`
# related_resources:
# - description: documentation
#   ref: https://www.acmecorp.example.org/docs/regal/aggregate-allow
# schemas:
# - input: schema.regal.ast
package custom.regal.rules.organizational["at-least-one-allow"]

import data.regal.ast
import data.regal.result

aggregate contains entry if {
    # ast.rules is input.rules with functions filtered out
    some rule in ast.rules

    # search for rule named allow
    ast.ref_to_string(rule.head.ref) == "allow"

    # make sure it's a default assignment
    # ideally we'll want more than that, but the *requirement* is only
    # that such a rule exists...
    rule["default"] == true

    # ...and that it defaults to false
    rule.head.value.type == "boolean"
    rule.head.value.value == false

    # if found, collect the result into our aggregate collection
    # we don't really need the location here, but showing for demonstration
    entry := result.aggregate(rego.metadata.chain(), {
        # optional metadata here
        "package": input["package"],
    })
}

# METADATA
# description: |
#   This is called once all aggregates have been collected. Note the use of a
#   different schema here for type checking, as the input is no longer the AST
#   of a Rego policy, but our collected data.
# schemas:
#   - input: schema.regal.aggregate
aggregate_report contains violation if {
    # input.aggregate contains only the entries collected by *this* aggregate rule,
    # so you don't need to worry about counting entries from other sources here!
    count(input.aggregate) == 0

    # no aggregated data found, so we'll report a violation
    # another rule may of course want to make use of the data collected in the aggregation
    violation := result.fail(rego.metadata.chain(), {
        "message": "At least one rule named `allow` must exist, and it must have a default value of `false`",
    })
}
As you can see, the aggregate rule is split into two parts — one that collects data (aggregate), and one that reports
violations (aggregate_report).
Use of helper functions like result.aggregate is optional, but highly recommended, as it will have any aggregate
entry contain information like file, location and package, which is useful both for reporting, but also for debugging.
Use a print or two in the aggregate_report rule to see exactly what's included!
Parsing and Testing
Regal provides a few tools mirrored from OPA in order to help test and debug custom rules. These are necessary since OPA
is not aware of the custom built-in functions included in Regal, and will fail when encountering
e.g. regal.parse_module in a custom linter policy. The following commands are included with Regal to help you author
custom rules:
regal parseworks similarly toopa parse, but will always output JSON and include location information, and any additional data added to the AST by Regal. Use this if you want to know exactly what theinputwill look like for any given policy, when provided to Regal for linting.regal testworks likeopa test, but aware of any custom Regal additions, and the schema used for the AST. Use this to test custom linter rules, e.g.regal test .regal/rules.
Note that the print built-in function is enabled for regal test. Good to use for quick debugging!
Built-in Functions
Regal provides a few custom built-in functions tailor-made for linter policies.
regal.parse_module(filename, policy)
Works just like rego.parse_module, but provides an AST including location information, and custom additions added
by Regal, like the text representation of each line in the original policy. This is useful for authoring tests to assert
linter rules work as expected. This is the built-in function equivalent of the regal parse command.
If the filename provided ends with _v0.rego, the policy will be parsed as a Rego v0 module.
regal.last(array)
This built-in function is a much more performant way to express array[count(array) - 1]. This performance difference
is almost always irrelevant in "normal" Rego policies, but can have a significant impact in linter rules where it's
sometimes called thousands of times as part of traversing the input AST.
Rego Library
In addition to this, Regal provides many helpful functions, rules and utilities in Rego. Browsing the source code of the regal.ast package to see what's available is recommended!
Note however that at this point in time, the Rego API is not considered stable, and breaking changes are likely to occur between versions. If you need stable versions of rules and functions found here, consider copying them into a library of your own, and use in your custom rules. Or engage with the Regal community and tell us what you need and depend on, and we'll try to take it into account, or at least help you find ways to make it work!
Community
If you'd like to discuss custom rules development or just talk about Regal in general, please join us in the #regal
channel in the Styra Community Slack!